Fabric wrapped holsters… In my opinion, they’re fantastic. The major problem with most rigid holsters such as those made from Kydex or Nylon being that anything that touches them can generate unwanted noise.
Over the last few years we’ve seen fabric wrapped holsters become more and more prevalent, particularly the Safariland range and in particular their 6354do holster.

In addition to the noise benefit, there is a slight advantage offered as with fabrics you’re able to both conceal the shine that a well used Kydex holster can attain as well as offering a camouflage colour in a Milspec, IRR material.
So, I got very lucky a couple of years ago. I managed to grab a sheet of Gearskin from a good friend of mine who said it was surplus to their requirements. I immediately used a sheet to cover one of my HW Holsters, and although I didn’t do a terrible job, there’s always room for improvement. It wasn’t helped by the fact that the Gearskin appeared to have cured itself to the backer paper, proving incredibly difficult to remove and apply…

Recently I’ve been given the opportunity to test out a low profile Glock 19 holster from Backcountry Workshop, whilst this is being tested I thought I’d have another crack at covering a holster. The main reason for this is that this holster is primarily going to be used as part of a woodland set up where my X300 Ultra SureFire isn’t really going to be much use.

I wanted something very low profile for both woodland skirmishes and where I’m playing OPFOR and might need a holster I can conceal under a shirt or jacket. The noise aspect will certainly come into play when using a covert holster… the telltale scraping of Kydex on a toggle or zip etc would surely result in a full search from a vigilant Task Force member.

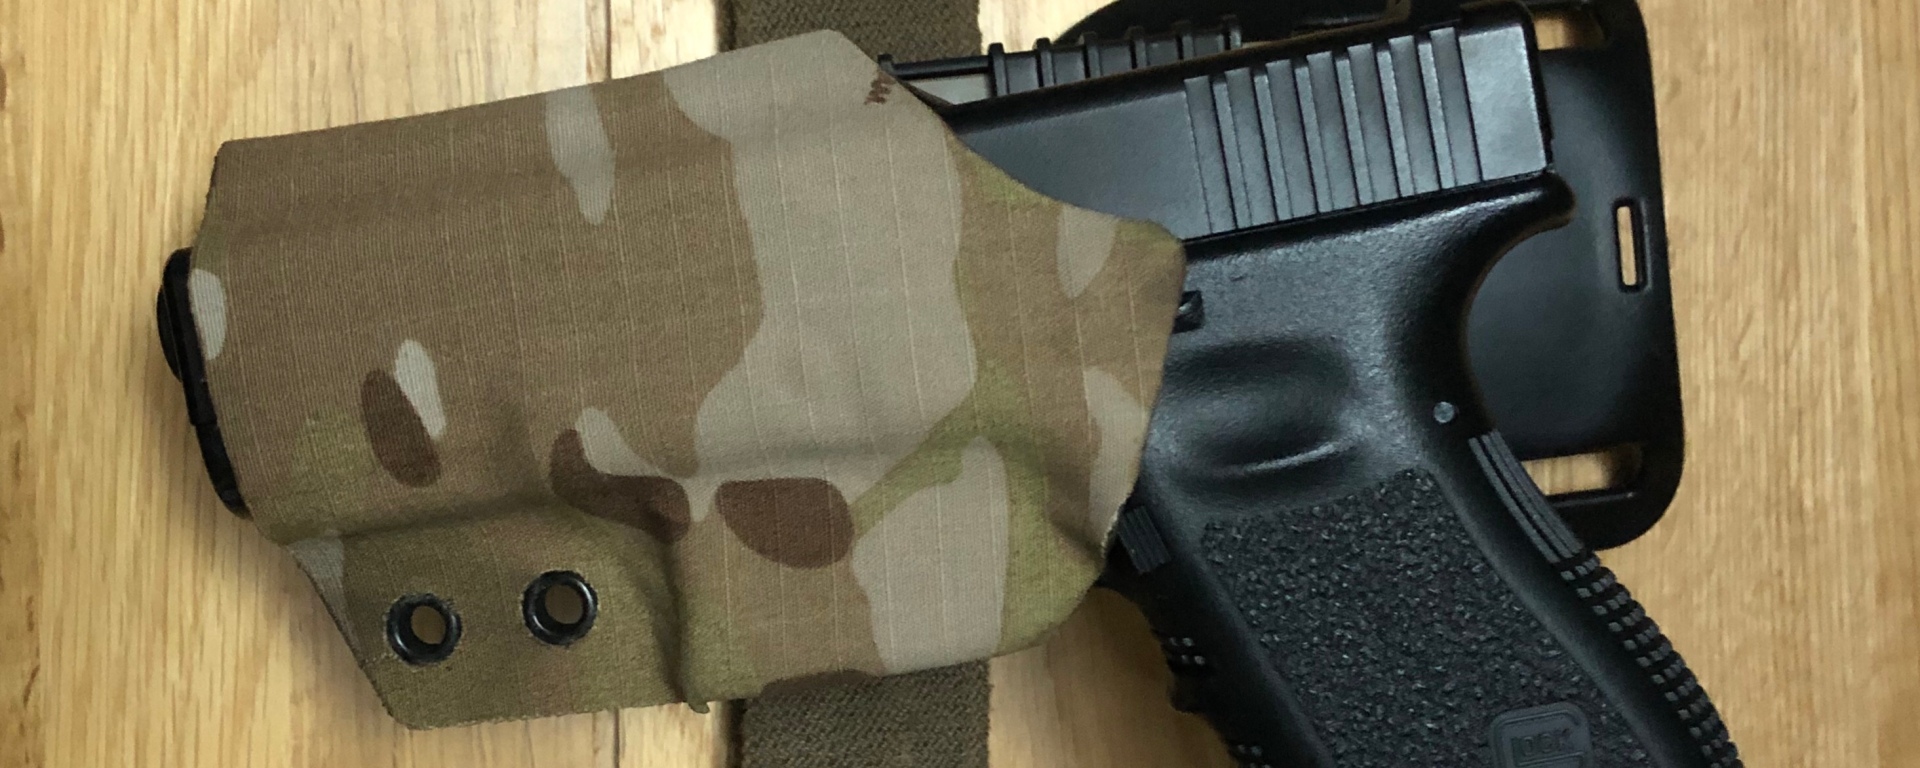
In order to do a proper application tutorial I decided that a fresh sheet was what was needed, with my HW Holsters Glock 19 Holster already in Multicam Black I’d decided to go for a less popular colour but one that fits the SEAL Team vibe… Multicam Arid.

So, where to start? Well as with most things, preparation and the correct tools. You will need a workspace, time and the following tools.
- A holster to wrap
- A sheet of Gearskin
- The relevant tools to take the holster apart
- A pair of sharp scissors
- A sharp knife or scalpel
- A lighter
The first step is take is to test out the Gearskin… as much as I don’t like wastage, getting used to how a fabric behaves is pretty vital when working with it where it counts. I’ve had a modest background in professional Upholstery, the feel or hand of a material can tell you a lot about how it will act when mounting it to a surface.
Some materials are a sod to work around compound curves but there are a few tricks you can use to hide the faults of the material, luckily Gearskin is rather pliable with a 2-4% stretch within the fabric itself. It’s incredibly malleable, although that can mean mistakes happening when you’ve managed to get it stuck to itself.
I’d suggest taking the mounting hardware off your holster, down to the bare minimum. Sometimes the locking mechanism isn’t removable and you’ll have to work around it, if that’s the case then it’ll create a little more work… but nothings impossible if you plan ahead and think about each step.
Once your down to little more than a Kydex shell, I’d thoroughly recommend giving the holster a good clean. Kydex is a funny material, it can have an almost waxy feel to it… it’s one of the things that makes it so good for holsters is it’s almost self lubricating nature. But when you’re trying to get something to adhere, you want the surface 100% clean. I use a bowl of warm water with a drop or two of fairy liquid in it, it takes off the dirt and then towel off to dry. Don’t leave it on a hot surface or use a hair drier or you’ll possibly end up with a flat sheet of Kydex again!
Now that you have a clean and dry holster, you can go about getting the Gearskin sorted. Firstly, orient the pattern of the material to how you want it, there is often a correct way up on camouflage patterns, upside down is usually ok but patterns like Multicam have a horizontal bias… It looks odd if it’s put vertically. It’s easy to work out which way Multicam material is supposed to face as it has small MULTICAM watermarks that’ll show you up from down.

Once you know roughly how much you need I’d suggest cutting out the approximate shape, it will mean there’s some wastage but unfortunately that’s a part of making stuff… omelettes and broken eggs etc. With it cut to the approximate shape it’ll be much easier to work with, but for the love of god make sure you’ve left a generous amount to allow for working around curves etc.

There’s a few ways to proceed from this point… personally, I’d peel the backing paper back to where the holster has a natural straight line… this will allow you to work with one half of the holster and not worry about the Gearskin bunching up into an unworkable mess.

With a fold over Kydex holster this line is usually on the sight channel, on other holsters such as SERPA or IWI models you’ll have to take your pick. Ideally though you work from a straight line on the front and work your way outwards from there, this should make the job easier and provide a clean and professional look when it’s done.
 So, every holster is different and has its own peculiarities… The 6354do is a relatively easy holster to re-skin and as far as I know it’s done during the forming process. I know HW Holsters also usually mould the holster pre-wrapped which makes sense but that’s not always an option. When retrofitting the Gearskin to an older holster you have to take into account the way it’s formed and also any hardware that isn’t able to be removed first as this will need covering or cutting out.

In terms of what to expect, there’s going to be areas that make you scratch your head on the best way to achieve what your after… Some people just slap it on and cut it out but I’m a little too OCD to do that, in all honesty the only real difference is in the aesthetics if you do that but I’m a firm believer in preparing first and doing the best job you can.
There might be a few troublesome areas that need cutting whilst you stretch the material, just be aware of how the material is going to behave and I’d warn against making a cut unless it’s firmly stuck to the surface you intend first, it’s a common mistake to cut too short and not leave enough to cover the area needed.
Gearskin does seem to allow for a little bit of flex over curves etc, but don’t expect miracles… Certain areas might need cuts making to get the amount of curvature needed. I’d strongly suggest using your knuckles and fingertips to really get that material around the inside of a convex shape and getting the material to stick to the recesses before working your way outwards.

Once you’ve worked the material over the surface it’s time to look at finishing it, this is where you really need a bloody sharp knife. I’ve used a Swann Morton Scalpel for many many years, from balsa to plastic it’s by far the most precise cutting tool I’ve ever used. A fresh blade will cut through the material without a seconds hesitation and give you a damn clean line. The point is perfect for detail work and the edge will help work around the loose edge of the material.

At this stage it’s a good idea to give the holster a quick test, making sure that none of the material is going to cause an issue with its operation. You could holsters wrap over the top into the pistol well, but it’s not something I’d recommend. Certainly on most of my holsters it’d cause issues with pistol fitment.

After you’ve made all the cuts you need it’s time to seal the ends, a turbo flame lighter is preferable but a normal gas lighter will work (but not quite as well), work your way around the holster and get the flame to touch the very edge of the cut Gearskin, this isn’t an absolute necessity but I’m not a fan of loose threads (although you can’t stop it, this only slows the process down).

With this done you should be left with a nice clean edge that should last a while, it’s never going to last forever but it should at least give you a professional looking finish to your holster.

All that remains now is to replace all the hardware and put the holster back to use, just be aware that if you’ve covered the rear of the holster that you’ll need to be careful with over tightening anything where the material is touching as it could cause the fabric to twist.
I’ve actually not covered the whole rear of my Kydex as I didn’t feel the need, it’s covered where it needs to be and it made it a lot easier to work with. I also only bought a small sheet so there wasn’t a great amount of excess to work with, a small sheet being 30cm square.

I sourced the material from Contact Left Ltd who are the UKs primary importer, however it is possible to buy direct from Gearskin or through 3rd parties such as eBay. The material is ripstop based and the adhesive does indeed get tougher to remove over time. They say that it’s easily repositioned on the initial use but I’ll be honest it’s a ball ache if it sticks to itself, just be sure to have a clear workspace and work in manageable areas.

The overall effect is fantastic and its really given the holster a fresh new look, anyone who is looking to revamp their Kydex should certainly consider Gearskin, it’s certainly something I’ll be using in the future… I might even give the NODs a bit of a spruce up.

