Before we start, there’s the small matter of what the correct name actually is for Tokyo Marui’s range of gas blowback M4 replicas. Whilst they’re commonly referred to as “MWS” or “MWS System” replicas, but this isn’t strictly the correct nomenclature for Marui’s M4 gas line. They’re actually referred to by the Tokyo Marui themselves as either ZET System GBBR or simply Gas Machine Gun Series.
However, the MWS tag seems to have stuck firm since its original M4A1 Modular Weapon System (MWS) incarnation, with the whole range of Marui gas blowback M4’s inheriting this same moniker, certainly within the English speaking Airsoft community. With that in mind, I generally use ZET System and MWS System interchangeably.
I’ve already covered my original ZET/MWS System purchase, the 10.5” barrelled M4A1 CQBR, in a previous review (see here). But as time goes by and I feel that the Marui ZET/MWS system as a whole could do with a more detailed write up, the urge for me to write another and more detailed review has intensified.

I’ve also had the irresistible urge as of late to recreate one of my previous builds, A pretty vanilla M4A1 Block 1 SOPMOD package, with a barrel mounted M203 grenade launcher. It’s a classic M4 look and one that’s becoming increasingly rare on the Airsoft field, with a modern trend towards M-LOK handguards or very specific, niche AR-15 builds such as the L119A1/2 becoming ironically better represented than the more commonly used, generic M4A1 Carbine.
After all the hard work and money spent getting it to its current state, my older CQBR is staying in its current “Mini URG-I” guise. To get what I wanted visually, I really needed a new base replica to start from, but the million dollar question is which one would get me to the desired end result with the minimal financial outlay? Well, considering that I’d already put aside the KAC type RAS rail from my previous purchase, the “barebones” M4A1 Carbine model appeared to be the most logical and cheap option.

A bit of background to the ZET/MWS platform, to show you where this model sits within the range. A couple of years ago, just before I purchased my CQBR, Tokyo Marui released the ZET System M4A1 Carbine. This coming out after they’d released the original 14.5” KAC railed MWS, the civilian type MTR16 and the 10.5’ CQBR in both Black and FDE/Tan furnished options.

The original MWS model apparently underwent at least 5 years in development to get it to the stage where Tokyo Marui were happy to unveil it to the public, its eventual release date being postponed, at least once, by an 18 month period to ensure that the finished product would live up to its expectations.
It’s an easy win for Tokyo Marui to make such a simple iteration of the M4A1, recreating the simple look of the earlier, USGI M4A1 Carbine at a lower retail cost, and with a key appeal to those wanting to build something drastically different to the base replica.
However, it also has a certain appeal to many buyers in its retailed guise, as a vanilla M4A1, a look which for some people will bring back echoes of late 90s action movies (although not actually seen in film until 1997) and is exactly how it should stay, free from railed fore-ends and using only the distinctive carry handle and A-frame mounted iron sights.

With this being an in-depth review, let’s start at the box it arrives in. Packaging is something Tokyo Marui have always done very well, even a seasoned Marui owner like me can still feel a rush of excitement when taking that lid off the box for the first time.

A cardboard insert complete with artwork is placed over expanded polystyrene sections, this is par for the course with Tokyo Marui replicas and something that adds a little class above what you find the competition using to package their replicas in (G&P literally chucking their replicas in a brown box with virtually no packing material). A pair of one-wrap straps hold the replica in place, the magazine sitting separately on a form fitting polystyrene block.
The lid has a number of corresponding polystyrene blocks, which when the box is closed, should prevent any unwanted movement of the replica and the magazine. There’s even a small section of plastic, taped over the area where the forward assist might end up damaging the front of the box if too much weight is placed upon it.

When you remove the replica and magazine from the box, you’re greeted by a couple of pictograms which emphasise the importance of not sticking your finger (or other appendages) into the ejection port and also highlighting the risk of damage to the front hand-guard or receiver if not taking proper care when opening up the receiver. There’s even a warning against closing the receiver without a bolt carrier group in place… Something you’ll only ever do once!

A small box contains a hundred rounds of high quality .25 ammo, the red muzzle cap and a plastic front sight post (FSP) adjustment tool. Under the cardboard itself theres an old-school tube and rod loading tool alongside the unjamming/cleaning rod. I failed to notice the loading tool when taking my original CQBR out of its box, I’m sure I won’t be the only one thinking “Damn, I wish I’d found this earlier!

The manual is comprehensive, a short excerpt in Japanese from BLACK RIFLE II – The M16 Into The 21st Century written by the well respected firearms guru Christopher R. Bartocci acts as a foreword to the manual, a list of some of his free to read articles can be found here. Without going too deep down the rabbit hole, he knows his stuff and has a rather impressive resume that includes Colt Manufacturing amongst his previous employers.
The rest of the manual is thankfully easy to decipher, even for those who cannot read Japanese. One thing that stands out is that Tokyo Marui place such an emphasis on safety, that the very first picture shows the importance of wearing eye protection. It then goes on to show everything from not giving your replica to a toddler, to whatever the hell is going on in the below pic.

After the safety brief, a round up of how the replica functions and an exploded cutaway diagram which details the entire part list complete with order numbers, finishes off the booklet. The part lists that Tokyo Marui provide on their replicas can be an invaluable tool, searching for a part by the name you’ve made up in your head just doesn’t work in the real world. Knowing the exact part number will show you exactly what you need, even if it doesn’t help you find one in stock anywhere outside of Japan’s own prohibitively exclusive market.
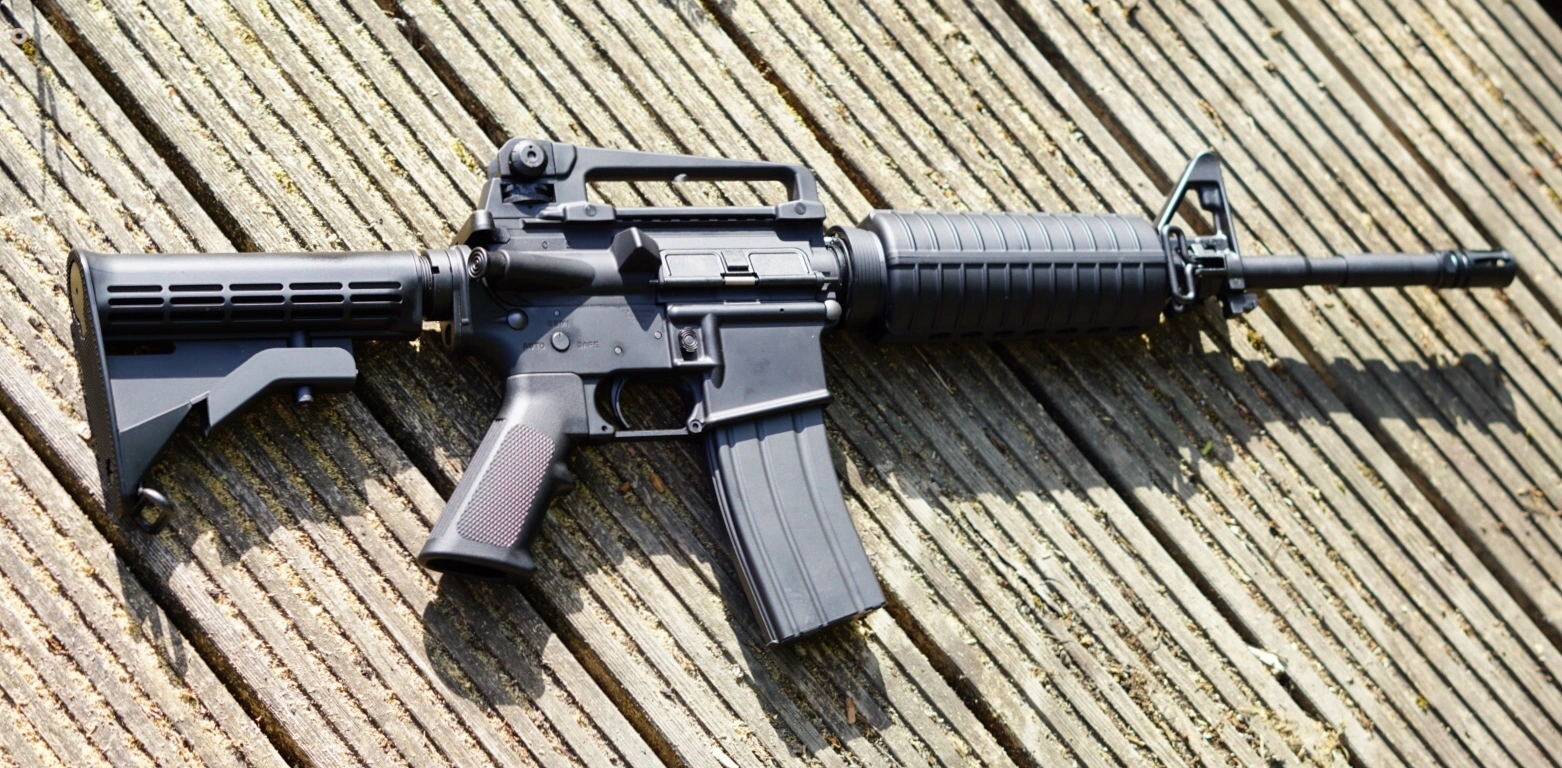
This brings us onto the replica itself. The first thing you’ll notice is the Cerakote finish, this being one of a scant few airsoft replicas on the market to come as standard with a factory applied Cerakote finish.

The Cerakote that’s used on Marui’s ZET/MWS System GBBR line is reputedly applied by Japan’s first and foremost Cerakote licenced business, Suzotomo Gun Tailoring (SGT). They might be better known by those of you who’ve dabbled in the dark arts of the PTW as a once popular provider of luxury receiver sets for Systema PTW owners.
And this finish is one area in which it appears to divide people. Some are not a fan of the way that it prevents the replica from aging conventionally, the Cerakote just refuses to take on a patina in the same manner as most other airsoft guns (and indeed firearms). A good case in point being my original CQBR’s receiver, that even after several years of abuse could pass for being a mere week or two old.
It’s an argument I can appreciate, but the simple fact is, that outside of a few very high-end replicas (and funnily enough some Cyma AKs), the majority of airsoft replicas are made using Zamak/Mazak “pot metal” castings.
A cast material such as Mazak-4 simply won’t have the same visual look as a machined piece of aircraft grade 6061/7071 billet aluminium. You simply cannot anodise Zinc based metals such as Mazak, resulting in Airsoft manufacturers generally covering up their cheap metals by painting them or rarely, powder-coating. This approach works for a while, but even Marui’s own receivers don’t stand up to the abuse very long and tend to wear in way that some like but actually doesn’t truly reflect the way a real firearm wears.

Cerakote is also not strictly the correct coating for a mil-spec clone M4A1 (with a few exceptions), but it’s a great option in terms of durability and longevity for an Airsoft replica. I’ve owned my original CQBR for nearly 2 and a half years now and the distinctive wear between Cerakoted and non-Cerakoted parts is incredibly evident. Overall though, I’m more than happy with this premium finish. Certainly on a replica I want to keep looking factory fresh, it does exactly what it’s designed to.
A couple of removable protective covers are installed onto the ZET/MWS System M4’s, the M4A1 carbine comes with a small strip of high-density foam directly below the ejection port dust cover. This stops the dust cover from hitting the receiver and damaging the durable (but not indistructable) Cerakoted finish on the lower receiver.

Another removable sticker sits on the lower plastic hand-guard, this is designed to take the impact out of the magazine well hitting the hand-guard when opening up the receiver group for inspection or maintenance. I removed mine almost immediately, but its something a newbie to the platform will appreciate on the first couple of times you take apart your M4.

Working from front to back, the muzzle is an aluminium reproduction of the Colt A2 Birdcage flash hider. Although at a glance its similar to the repro KAC QD flash hider found on some other Marui M4’s, it differs by lacking the anti-fouling ribs on the outside and no notch for the fitment of a Knight’s Armament Co. QDSS-NT4 Suppressor.

The outer barrel is a single piece 14.5” with a “government” profile, this is well modelled on the genuine item and has the correct, stamped marks for an issued M4A1. Removing the flash hider will reveal an AEG spec 14mm Counter Clock-wise thread, so finding your desired suppressor or flash hider shouldn’t prove difficult.

A couple of inches from the muzzle, the Front Sight Post (FSP) is recreated in cast metal, the same mould lines as a genuine steel FSP are recreated and a “proof-mark” is shown on the right hand side (although I’ve not been able to verify if this is an accurate proof-mark, I’ll assume its close enough… Ignorance is bliss).

The front sight post is adjustable in it’s elevation with the included tool, a retaining pin preventing unwanted movement within the post itself. The FSP also houses a reproduction of Colt’s own Tactical front sling, side swivel mount. Its a pretty nice copy aside from the lack of a rubberised sling loop, I’ll retain this when I fit the M203, as it provides a solid mounting point that isn’t in the way of the launcher. It’s also fully ambidextrous in its design, useful if you’re a degenerate southpaw like me.
Behind the FSP, sits the handguard cap, this locks the front of the handguard onto the FSP itself. A small hole at the bottom engages in an anti-rotation pin in the FSP and the top has another hole to allow a mock gas tube to run through it, over the top of the barrel.

The hand-guard that’s supplied on the MWS/ZET M4A1 is of the wide tapering plastic design on later model, non-railed Colt M4A1’s, with a heat-shield built in on both halves. Its a clamshell design and the inner heatshields are made slightly off centre to allow them to form a solid and wobble free fit when placed onto the barrel.

The rear of the hand-guard is held together with a delta ring assembly, a similar enough layout to the Next Gen Recoil Shock (NGRS) delta ring assembly, that anyone experienced in Tokyo Marui NGRS M4’s will be used to the design.

The sprung outer collar moves rearward under tension, which allows the hand-guard to be fitted. Under this collar is a compound leaf-spring, a marked upgrade from the original Marui Recoil Shock design, which unlike its real steel counterpart, used a single coil spring.

Under the spring sits a two-part barrel nut, the rear portion locking the barrel onto the receiver and the front part bolting to the barrel itself. It‘s not my favourite part of the replica, but its a vast improvement on the older, NGRS design, with a bigger bolt holding it in place on the barrel itself which seems to hold up to more punishment than its electric cousin.

The threaded part of the barrel nut is Marui AEG/NGRS spec, but the barrel itself is a different design. You’ll need an MWS/ZET System spec barrel if looking to change the barrel around but if it’s just the rail that your swapping out, a few companies such as PTS and Laylax actually make barrel-nut adaptor collars specifically for the MWS/ZET series.
HAO actually provide an MWS drop down option to their M4 compatible rails, such as their Mk16 rails (9.3” reviewed here and 13.5” reviewed here) with a fantastic brass collar (fits within the AEG spec nut) as one of the fitment options when purchasing. A great plus for MWS/ZET owners and one of their subtle shifts towards the Tokyo Marui platform that marks them as a forward thinking, MWS friendly manufacturer.

Onto the receiver, a “flat top” type with a built in Picatinny MIL-STD-1913 type rail built in. We’d all love to see Tokyo Marui build an early version of their NGRS or MWS/ZET line with a fixed carry handle, but its rather unlikely to happen. A plastic reproduction carry handle sits atop the replica, whilst a metal one might have been preferable, the plastic one will probably be swapped out by most people and actually doesn’t stand out as being plastic until you get very close.

The rear sight sits within a “floating” block on the rear of the carry handle, adjustable for windage and elevation with a flip aperture that allows you to swap between a “battle sight” set for 0 – 200m and the smaller peephole to be set at your rifle’s effective range. For airsoft this wont ever really be a necessity, although some might have a personal preference to the smaller aperture.

A Colt type charging/cocking handle sits within the rear of the upper receiver, the MWS/ZET series uses their own design which is far shorter than a real one, there are some MWS/ZET compatible charging handles on the market, Angry Gun (their BCM/VLTOR charging handle is the only MWS/ZET part I’ve zero issues with) and Z Airsoft (their ACH being a great replica) are probably the two most well known.

The receiver itself is split in two as per the real M4, a pair of take-down pins allow you to split the upper from the lower. For most routine maintenance, simply pulling out the rear pin will allow you to pivot the upper for inspection of the trigger and hammer unit, the magazine well and once you’ve slid the bolt carrier group and charging handle rear wards, the upper receiver, breech (hop unit) and the barrel itself.

The receiver has the typical Marui blend of genuine and airsoft trademarks, the Colt logo and weapon designation being cast into the left side of the magazine well and further trades being shown to the rear of the receiver, forward of and around the fire selector switch on the left hand side. A colt proof-mark is embossed onto the upper right rear of the receiver, Tokyo Marui’s own marking being subtly placed on the right hand side of the lower.

The ejection port is covered by a flip down dust cover, this is mostly cosmetic with your run of the mill AEG, but its pretty important with GBBRs to ensure this is closed again whenever you’ve got the chance to do so. It’ll prevent the ingress of dirt and foreign bodies into the inner workings of your M4A1 and its generally considered good practice to ensure this is closed wherever possible.

Controls on the Marui M4A1 are the same as on all the other MWS/ZET pattern M4 replicas (except for the MTR16), a standard colt type magazine release catch is fitted, this follows the threaded axle design of the genuine item, the dimensions are slightly off-spec though so a little work is needed to fit real spec magazine releases.
The bolt release is functional (as you’d expect from a GBBR), A firm but not overly harsh push or slap will allow the bolt to be released forward into battery. Again, there are aftermarket options on the market, as with the charging handle and other controls but I’ve had no end of issue with Angry Gun “upgrades” and the stock part works more than well enough with both my replicas.
The trigger… Something that its detractors use as a common argument against owning a Marui GBBR. Yeah, I’m not going to lie, theres room for improvement. Its mushy with a little bit of a weird reset. There are drop in and adjustable upgrades available, I might consider one in the future but after a few thousand shots, the standard unit does tend to smooth out a little and becomes easier to live with.

The pistol grip that’s supplied will feel a little odd to those of you who are moving to the GBBR world from AEGS, but that’s to be expected. The reason for this is that the ZET/MWS system is real steel compatible, and therefore the grip is narrower than you’ll probably be used to. The only thing you must ensure is that you retain the Marui bolt, as most grips are supplied with an imperial bolt and Marui being Japanese, they use metric threads. I’ve fitted both Magpul and BCM grips to mine without issue and I’m sure others, such and Hogue and Ergo would prove just as simple to fit.

The buffer tube is an adjustable 6 position type, fitted with Marui’s reproduction of a Colt LE Stock. Its alright, it does rattle a little but so does the real one. The buffer tube is Marui spec but its close enough that genuine mil-spec tube stocks will fit, mostly without work needed.

The bolt carrier group is designed to mimic that of the real M4, It doesn’t stand up to close scrutiny but its not bad considering. The locating lugs are replicated on the face of the bolt, helping disguise the shape of the very airsoft-like nozzle. These lugs engage the corresponding channels in the breech around the hop unit and appear to form a very close fit, going some way to keeping the nozzle as a whole in a very consistent “in battery” position.

The magazine, its a 35 round gas filled replica of the Steel 30 round Colt STANAG design, which can prove to be quite tricky to fill. the gas inlet valve is on the bottom and the ammo is loaded via the feed lips.

I’d recommend buying a Marui pistol speed loader, after everything I’ve tried, its still the best option for loading these magazines. There is apparently a revised design (Thanks to BadaBing for the heads up on this) with the newer magazines being marked with a “2” underneath the base plate and apparently having a much better economy of gas.

I don’t talk about how many shots I can get with a single magazine’s fill of gas. I generally operate on the principle of fill ammo/fill gas. I only need a consistent 35 shots from each mag, anything left in the tank after that is just helping to keep the pressure consistent.
The internals are what makes a Marui such a performer though, so why is this regarded (by many) as the best out of the box performing GBBR? Well the aforementioned ZET/MWS System is primarily what gives a Marui GBBR M4 its consistently snappy response, foregoing a little internal realism for the sake of a purpose built and smooth hammer assembly which lacks the visible “hammer” of a real firearm or some of the other GBBRs on the market.

The hop is also of a simple yet effective and consistent design. A rotary wheel within the upper receiver allows a hop adjustment arm to push down on the hop rubber, this rubber and inner barrel being a “VSR cut”, known for its consistent and accurate performance.

The inner barrel is a surprisingly short 250mm, this falls far short of the 363mm standard length you’d see with many M4 replicas… Installing a longer inner barrel is a pretty good way of upping your FPS, but in regards to accuracy, Marui’s stock brass 6.08mm bore barrel is a perfectly adequate option for the majority of games and especially for those people who don’t wish to mess around with their replica.
So… How does it perform out the box? To test its stock performance, I’ve used my Xcortech X3200 chronograph and a home made range. The range is set up for 25m (6” steel) and a tree at 50m (both measured with a paracord line) within my garden, its not perfect but it gives me a good overall idea of performance. The weather was a respectable 20 Celsius at time of testing and there was a steady breeze which occasionally caused some shots to stray. I was using ASG Ultrair which I’ve found to be relatively consistent but primarily I use it because Fire Support usually have it for on sale at less than £5 a can, making it the cheapest way to feed your GBBR.

Starting with the .20 ammo and after adjusting the hop to achieve a flat flight profile, the average muzzle velocity was a respectable 307FPS (0.89 Joules) with a variance of 8FPS throughout a ten shot string. The accuracy was 90% to the 25m steel target with 9 hits out of 10 and the range was ok but not brilliant, 6/10 shots just hitting a tree marked as 50m away.
Moving onto .25 ammo and again making sure the hop is correctly set for a flat flight profile, the average muzzle velocity was 283FPS (0.98 Joules) with a variance of 9FPS throughout a ten shot string. The accuracy was 100% to the 25m mark with 10 hits out of 10 on steel and the range was much better with 9/10 shots hitting a tree marked at 50m away
Finally, the .30 ammo was zeroed in for the same profile and the average FPS was 260FPS (0.94 Joules) with a variance of 8FPS throughout a ten shot string. The accuracy was 100% to the 25m mark with 10 hits out of 10 and the range was good with again, 9/10 shots hitting the 50m mark… Although the flight time was noticeably slower.

So what can we take from the data above? Well the Tokyo Marui MWS/ZET System is pretty damn consistent, the drop from shot to shot is around 1 FPS (0.3% power loss per shot) with generally few outliers in the mix. Joule creep doesn’t appear to be too evident either, although that’s probably due to the short barrel that Marui may very well have installed to prevent users accidentally creeping over the strict Japanese joule limits.
Accuracy and range is on a par with Marui’s NGRS line up, maybe a tad better, although this could just be an implied gain and would certainly need an out the box, side by side comparison to be proven. Certainly it’ll outperform many other replicas (gas and electric) before any money, time and effort is spent messing around with the insides. I doubt anyone whose used to the single shot nature of GBBR skirmishing would feel underpowered, although I’ve a pretty confident feeling that by simply pushing up the muzzle velocity by 20/30 FPS we’d see the range with heavier ammo push out to maybe 60/70m… perhaps further still on a good day. But this route comes with two potential downsides; firstly the potential for unintended Joule creep (effectively giving you a hot weapon) and also the general unpredictability of messing with a proven formula.

Many people are quick to buy a replica and immediately start filling it with all sorts of expensive parts that some shop (or worse… random guy from facebook) says will put additional magic fairy dust inside your ZET/MWS Replica… But its important to know the actual stock performance of an airsoft replica BEFORE you start spending money, otherwise you’re just blowing your money on expensive parts and labour without any real understanding of what’s making that £600 upgrade package worth the installers claims and ultimately, no benchmark.
I’m not saying that upgrades are inherently a bad idea, I’ll actually be covering a few simple drop-in parts at a later date, but don’t be led into the thinking that stock Marui GBBRs underperform. You’ll find that with the decreased magazine capacity, you’ll probably adjust your play style accordingly. In addition, the boost you’ll get from shooting such a consistent platform will allow you to put accurate shots on target to a degree that some other platforms (both AEG and GBBR) can fail to live up to.

So, the golden reason why I’d suggest grabbing a Marui ZET/MWS GBBR? It boils down to the one thing that differentiates a GBBR from every other platform out there, the feeling of each and every shot has such a different and punchy feel, you simply don’t get the same feeling from a Recoil Shock, KWA or even a GBLS. It’s instant, it’s more kinetic and ultimately it’s more satisfying than any electric replica ever could be, even the ones that cost £1600.
You’ve got to decide for yourself why you want to move to GBBR platform, for some its a little bit of cheeky fun on the side, for others like me… Its my main focus and one that really only the Marui system allows me to face down high cap AEG and HPA users whilst still not feeling outgunned. I’m well aware that there are other GBBR platforms on the market, but I’ve yet to see one that’s ready to compete against the electric competition, straight from the box.
Can I recommend it to a friend? Wholeheartedly yes I can. It’s my platform of choice, my NGRS has been consigned to the role of back up for a couple of years now and having used the platform from cold winter nights at Swynnerton to the hot, dry summer days at Caerwent and all those skirmishes inbetween, I’ve never been happier with my choice of platform.

Now that I have a spare, I’ll most likely lend one out at some point to a friend and get an outside opinion from a seasoned PTW or Recoil Shock user. So are there any negatives to Marui’s GBBR system? Well, I’ve not personally experienced it but I’m informed that on occasion, the nozzle (or its spring) can break if using higher power gas than Marui’s recommended 134a duster gas, although this is an issue I’ve yet to come across personally with either of my two MWS/ZET System replicas.
There’s also the question around real steel compatibility, specifically for furniture and controls. Whilst pistol grips and rails will for the most part fit without issue, some oddities will leave you scratching your head. Trigger guards such as Magpul or BCM polymer drop-ins simply won’t fit without considerable work, other items such as the Lancer Tactical two-part enhanced magazine well will also fail to fit the Marui’s annoyingly just off-spec lower, and may never fit correctly unless serious correctional work is done to the part and/or replica. I’ve managed to fit the HAO reproduction of the Colt Canada L119A2 Ambi-Mag release to the MWS/ZET Lower (see here), but again, much like the majority of parts… It isn’t a drop in fit. So bear this in mind before buying.

So, there you have it, my personal review of the MWS/ZET System M4A1 Carbine. The only other piece of advice I can offer for potential newcomers to GBBRs is, do your research! Don’t base your buying decisions from one review and be sure that you know all the potential downsides you’ll run into before making the jump. Every spring I see people buying GBBRs, many of those are put back up for sale the following winter. The gas life isn’t for everyone, but for that special few, it’ll blow your mind.


Great review, from a fellow mws user who has owned a variety of gbbrs I fully agree with your assessment. The mws just performs and keeps performing. Where as other gbbrs I have owned have been very inconsistent and because of that I find I’m always bringing the mws as a back up when I intend to run another gbbr (like GHK, vfc and WE brands) as I just can’t fully trust it will perform throughoutthe day without an issue.
LikeLike